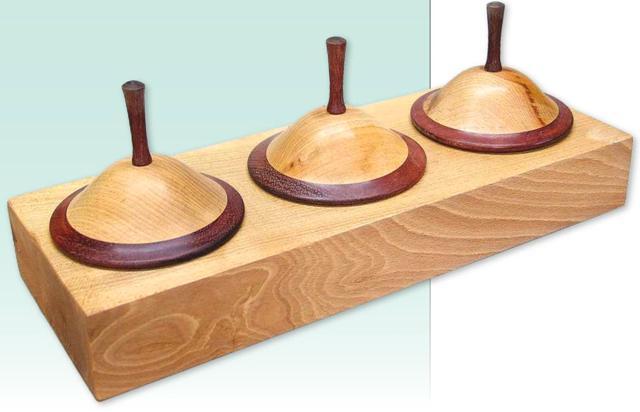
This combined egg cup and side bowl was made from a single disc of English cherry – a lovely creamy-textured wood that’s easy to work, making it an ideal turning timber for beginners

Start off with a disc about 150mm in diameter and 80mm thick. Attach it to the lathe using either a screwed-on faceplate or a single screw chuck, photo 1. You’ll need to drill a pilot hole in the centre of the disc first. Make sure that the face of the disc is flat and winds up hard against the face of the faceplate. The next thing to do is set a suitable lathe speed of about 700rpm. When turning any hollow vessel project, it’s an advantage to have a lathe with a swivelling headstock.
This enables the work to be rotated at 90° to the lathe bed, providing you with better access to the work. You want to be able to stand in a safe, comfortable, well-balanced position, facing the workpiece without having to stretch awkwardly across the lathe bed or compromise the cutting angle of your tools. Before you start turning, put on a face shield. This is especially important when you’re turning large-diameter work, as the speed generated at the rim of the disc is much higher than on spindle work.

Two-stage process
I’ve used a two-stage method to turn this egg cup and side bowl. This involves shaping the bottom of the bowl first, and then reversing it and hollowing out the cavities with the work held in a chuck. The advantage of working in two stages is that when turning the sides of the bowl, the cut is directed with the grain, leaving the grain fibres unruffled and smooth. With the bowl turned in the single-stage method, you have to cut the sides of the bowl in the opposite direction to the grain. This bends the fibres back and causes a ruffled finish.
I turned the egg cup and bowl using just one tool – a 1/4 in bowl gouge, ground with a 40° bevel and a standard straight-across edge. The bevel needs to be flat and free from secondary facets, as it performs like the sole of a plane, gliding on the surface of the work, while the cutting edge cuts the waste away.
Left-handed grip
Even though I m naturally right-handed, I hold the gouge in a left-handed mode to cut the bowl’s base and side shape. This enables me to look down the back of the tool and judge the angle of the bevel in relation to the workpiece surface. It also allows me to see the precise point at which the cutting edge of the tool comes into contact with the work.
Because the left hand anchors the tool handle against the body and the right hand is positioned between the back of the tool and the work, most of the pressure on the tool is exerted downwards onto the toolrest. This helps avoid the tendency to press the bevel too much against the workpiece, which causes uneven cutting, leading to a rippled or wave effect on the work’s surface.
Starting the job
Start cutting the corner away first so a simple facet is formed. This can then be rounded off to form the curved sides of the bowl. Hold the gouge firmly against the tool rest, slightly on its side with the bevel in line with the face of the work surface. Start the cut by re-angling the tool so that the cutting edge of the gouge is engaged with the work at the base of the flute, photo 2.

The tool must be held rock-solid in the path of the oncoming wood and mustn’t be influenced by the uneven surface it’s cutting. After the first pass, start a fresh cut slightly behind the start of the previous one. The action of the gouge slices through the wood fibres at their base and breaks them away at the side in one continuous action, while the bevel of the gouge glides over the smooth new surface that has just been produced. As the work proceeds, you will need to move the toolrest nearer to the work to maintain control over the cut.
Forming the bowl
To form the curved sides of the bowl with one continuous cut, swing the gouge slowly in an arc so the bevel of the tool remains parallel with the curve, photo 3. To do this while still supporting the tool handle against your body, stand in the position where you anticipate finishing your cut, lean back so that you start the cut slightly stretched out and off balance, and then slowly move back into a balanced position as you finish the cut.
Subsequent cuts to improve and modify the shape can be made by slicing off fine fillets. Start with the bevel flat on the surface and then feather the edge of the gouge into the surface so that no entry or exit sign is visible at the beginning or completion of the cut. A scraper can be used to shape the outside of the bowl, but this tool will usually undo the clean finish produced by the gouge, causing two broken or roughed-up areas where the surface has been scraped in the wrong direction. The best finish is achieved with a freshly sharpened gouge.
Perform this in the same way as the continuous shaping cut, only cut much more finely with a slower rate of feed. If possible, use a sharp unused part of the gouges’ cutting edge, as shown in photo 4. The gouge is placed slightly on its back, so the side of the cutting edge is engaged. To clean and flatten off the base, simply slide the gouge across using the same slicing technique as for the sides, photo 5.
Forming the dovetail recess

Cut the recess in the base of the bowl with a small square-ended scraper, photo 6. Place the tool horizontal to the work and hold it firmly down on the toolrest so that it’s absolutely rigid when it’s performing the cut. There must be no tool vibration, because this will effect the centring of the workpiece when it comes to fitting it onto the chuck. The dovetail is cut with a specially ground scraper which forms the
same profile cut as the chuck jaws, photo 7. It’s also very important that it remainsabsolutely rigid while it cuts the profile shape of the dovetail. Before doing anything else, test that the chuck fits properly, by hand-tightening it into the recess and rotating it to make sure that it is
centred correctly, photo 8.
Sanding the bowl
Wear an effective dust mask when sanding turned work. I use J-flex aluminum oxide cloth abrasive for almost all my woodturning needs, because it’s long-lasting and the flexibility of the fabric makes it ideal for the outside and the more difficult inside concave curves that occur in a lot of turned projects. I start off with 100 grit and work my way through to 240 grit before finishing off with 400 grit, using each successive grade to
remove the scratch marks of the previous grade. You’ll need to be quite liberal with the use of your abrasive if you want to achieve a good finish.
The purpose of the sanding is not just to make the surface smooth but to remove tool marks, and these usually become visible only when you are applying the finer grades of abrasive. Quite often you will have to go back over your work again with the coarse grit to remove some stubborn blemish which is too deep to be removed with the fine or medium grit.
Don’t be tempted to use your abrasive when it’s blunt, as this will often cause the fine end-grain cracking which can spoil an otherwise perfect piece of turned work. Watch the steady stream of dust which should accompany your sanding, and as soon as it disappears, change to some fresh abrasive.
Hollowing out
Fit the chuck onto the lathe, and then hand-tighten the bowl to the chuck before using the tommy bars to lock it on tight. To start the cut, position the gouge on its side with its bevel at a 45° lateral angle to the work surface, photo 9. The handle is held so that a 45° vertical cutting angle is attained and the height of the toolrest is adjusted so that the cutting edge of the tool is brought into contact with the centre of the bowl face. A small cut is performed which is then repeated one step back from the previous cut and going further into the centre of the disc. This produces the rounded cavity of the egg cup, which you can test for size using a standard egg.
Forming the side bowl
The next stage is to hollow out the side bowl. First remove all the waste to each side of the egg cup by working the gouge in the opposite direction to that used earlier. As you get closer to the finished width of the sides of the egg cup, fit a vertical tool post in the form of a piece of waste wood G-cramped to the tool rest, photo 10. This provides a rigid support at the back of the gouge, allowing it to be fed into the rim of the bowl at a 90° lateral angle without it slipping and spoiling the crispness of the work’s rim. Arc the gouge while feeding it forward and form one side of the side bowl and the sides of the egg cup. Test the thickness between your fingers after each cut.

Reposition the tool post for cutting the outer rim of the bowl and work the gouge in the other direction, photo 11. By working down one curve of the side bowl, photo 12, and then the other, photo 13, you gradually form the round-bottomed cavity of the bowl.
Photo 14 shows the gouge making a fine finishing cut on the inside of the side bowl. At the bottom of the cavity where you are at full stretch, particular care needs to be taken to avoid digging in with the gouge. Take very light cuts with the flute of the bowl gouge held upwards, photo 15. Trim the tops of the rims using the same technique, photo 16.
After sanding the work smooth, I finished the work with a product called Food Safe Finish, made by Chestnut Products. The finish was applied very easily with a clean cloth and left the wood looking very natural.