In this extract from Woodworking from Offcuts, Woodworking Guru shows us how to make this garden planter using just a few pieces of leftover decking.
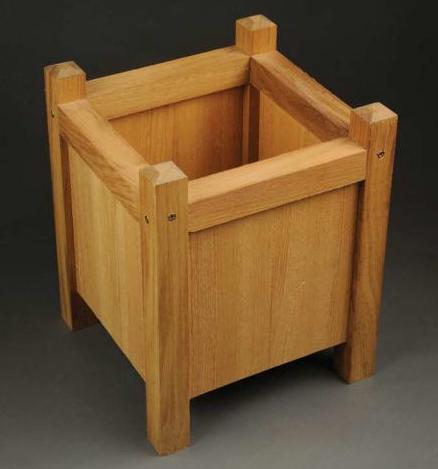
Photo: Garden planter
When making anything for use outside, select a material that is fit for purpose. This garden planter is made from iroko (Milicia excelsa) sourced from decking material; it requires the minimum of finish for it to withstand all that the elements can throw at it before deteriorating beyond repair.

Photo: Garden planter assembly scheme
The joinery in this project is not technically challenging, but an element of precise hand tool co-ordination is required for the finishing touches. A router table would make life easier, but is not essential.

Photo: How to make garden planter – step 1,2,3
1. Start by drawing the position of the grooves to accept the side panels on the edge of the stock. As the two internal faces are to be grooved, you will want to position them away from the centreline. The X-shape illustrates the position of the groove in the stock.
2. Use this measurement to make a mark for a stop or clamp to limit the amount of travel of the router when machining the grooves. If your material allows it, machine the components in pairs.
3. I used a 12mm-radius cutter to match the thickness of the side panel. Using a square, capture the measurement from the tip of the cutter to the outside edge of the router base.

Photo: How to make garden planter – step 4,5,6,7
4. With a chisel, make a clean mark across the two boards so that they can be realigned when turned through 90° to rout the second face.
5. Line up the chisel indents. The lines marked with an ‘X’ are the stop lines, so there is no need to mark out for the second row of grooves.
6. Square off the ends of the grooves as there will not be a shoulder on the panels to hide the ends of them.
7. Next, dry-clamp the frame together with the panels in place and mark out for the screws, avoiding the groove and panels.

Photo: how to make garden planter – drilling a hardwood
8. Use a strip of masking tape to set the depth of the screw hole in the corner posts.
9. As you are drilling close to the edge and into a hardwood, carry out a few tests to establish the right size of pilot hole for your screws.

Photo: how to make garden planter – mark the chamfer & cut
10. On the inside of the panels, screw a batten along the bottom edge between the corner posts.
11. Before assembling the frame, mark out for the chamfer detail on the top of the four corner posts. Use a marking gauge to divide the end of the post into an even pattern.
12. With your sliding bevel set to 20°, mark the chamfer on all corners around the post.
13. You should be able to cut close to the line with a saw to remove most of the waste.

Fine trimming and Your garden planter is ready
14. Fine trimming can be done with a block plane. It might help to clamp two posts together in the vice to give a more stable platform to work on.
15. Countersink the screw holes and screw the frame together.
16. You can then cut a piece of marine ply to fi t in the bottom of the planter, removing the corners. Screw it to the four battens on the bottom of the sides.
17. Your finished garden planter will look something like this.