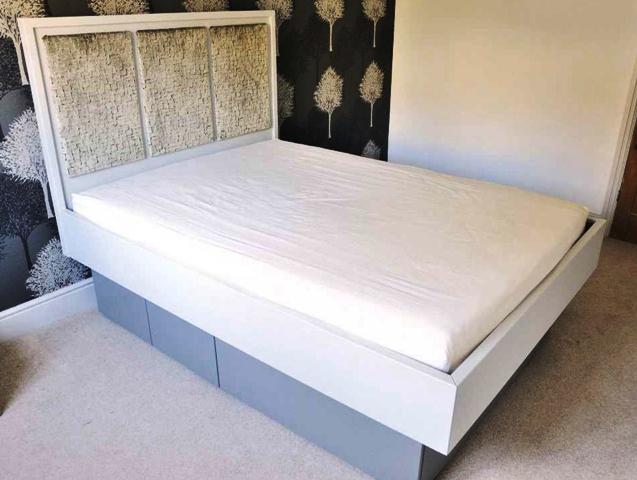
This is one of a pair of memory boxes that were commissioned as gifts for my clients’ grandchildren. It’s pretty straightforward – four dovetail joints, a base and a tray. And then there’s that curved lid. (By Michael Forster)
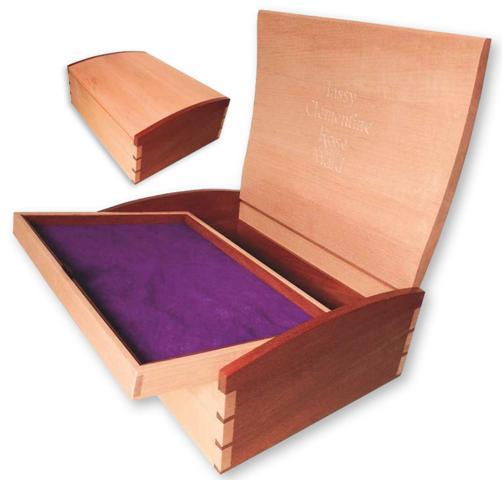
The box measures 370 x 280 x 150mm, and my clients wanted the grandchild’s name inscribed in the lid. Well, my carving isn’t up to charging for, so that task was subcontracted out to carver Mike Painter and won’t be covered in this article.
Prepping it up
I like to buy my timber in 200 x 100mm slab-sawn boards which I then rip down on the bandsaw to create quarter-sawn boards 100mm wide, thus virtually eliminating cupping. Unfortunately, in this case the size of the box meant that every panel had to be jointed up from two or three boards.
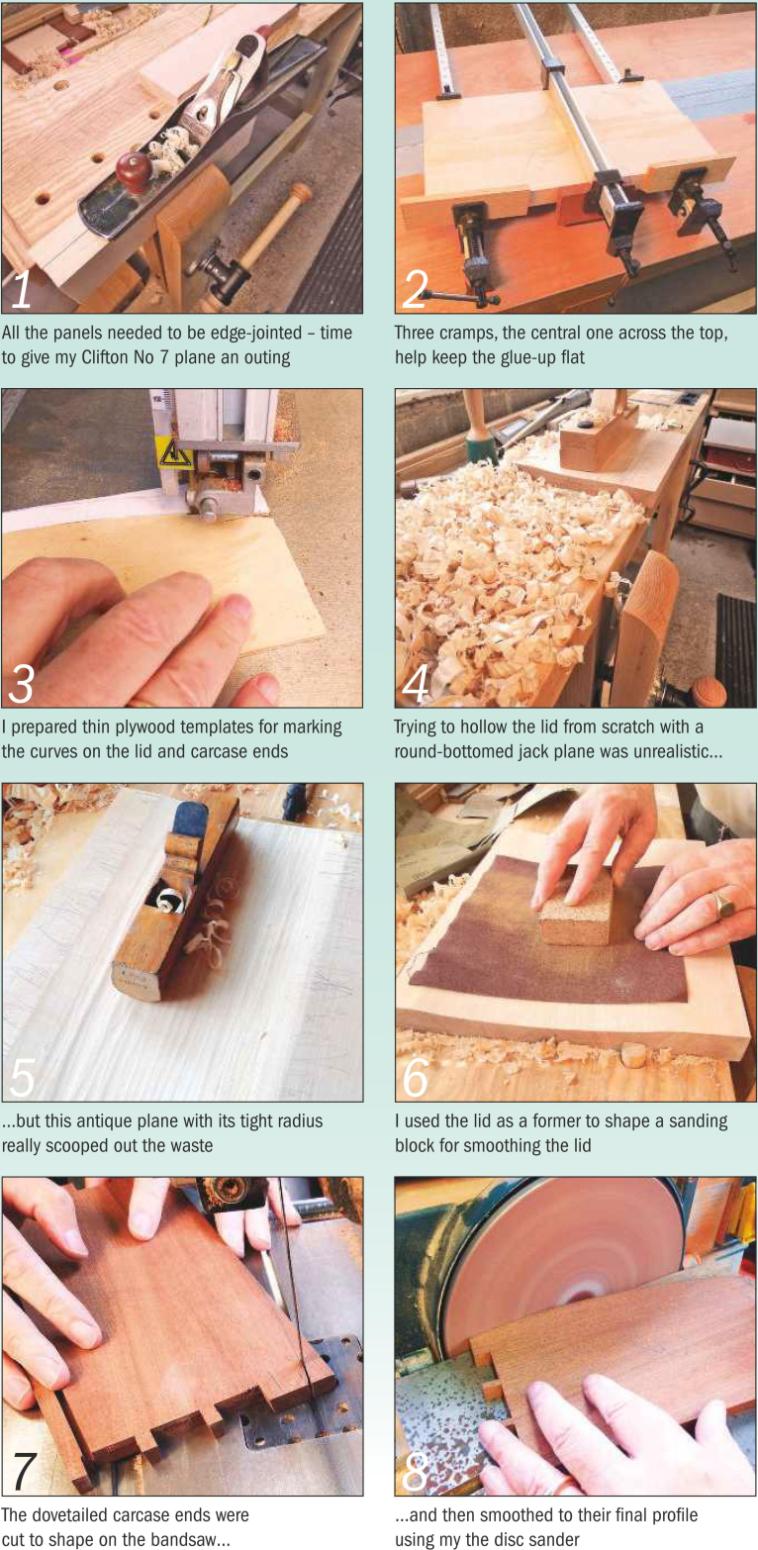
So having got my little pile of 100 x 12mm boards (100 x 27mm for the lid) I gave my Clifton No 7 plane a well-overdue workout before edge-jointing them. I then turned my attention to the lid, so the carver could be cracking on while I made the carcass.
Learning curve
That’s hardly an original pun, but it’s a very apt one here: this was my first-ever large convex surface. So here’s what I did, what I should have done, and what I eventually learnt.
I’m often asked why I don’t laminate curved lids, and I’m sure that question will occur to you, too. There are two reasons: I’ve never done that kind of work, so I prefer to stick to what I know; and apart from that I do prefer the look of ‘proper’ end grain when the lid is open.
An alternative would be to cooper it. That would reduce the waste as well as the effort, but it presents some tricky issues with the cramping up – so I was back to the hand-planing option.
A hard task
I started by hollowing the inside; with the outside still flat it would sit easily on the bench while I worked. I marked the inside profile on each end using a template I’d prepared earlier, leaving a significant flat area near the pivot edge to lower the centre of gravity, both visually and literally, when the lid was open. Then the fun began.
Attempting to hollow it from the flat using a round-bottomed jack plane wasn’t very encouraging. It soon became very clear that I’d have a long and sweaty physical workout ahead. Then I remembered some antique round-bottomed planes that I’d bought opportunistically at a fair, put in a cupboard and forgotten. One of those speeded up the job considerably, its smaller and more aggressively-curved blade working a little like a scrub plane and taking very heavy shavings. Then my round-bottomed Philly jack plane finished it off beautifully. Finally, I shaped a sanding block to the profile and sanded down through the grits before sending the lid off to the carver.
Second thoughts
By now I imagine that everyone reading this is bellowing ‘Router!’ at the page. That would indeed have been a much more efficient way of removing the bulk of the waste, but there were two reasons why I didn’t do that. Firstly, I’m really quite averse to the racket routers make, and far prefer (given time and energy) the silence of a hand plane as the bench becomes covered in beautiful shavings. Secondly, I didn’t think of it until it was pretty much too late.
Dovetails and grooves
Marking out and cutting the dovetails was a straightforward matter. I do it by hand as it’s one of the features the client is paying for, but they could be routed so long as a good jig is used that allows free adjustment of the proportions – equal tails and pins really don’t work on a decorative item like this.
The 4mm groove for the base needs to be positioned within the tails so that it can be run straight through on the pin boards to minimise complication, with stopped grooves on the tail boards. Scrap timber stops cramped to the router table easily deal with that. Cut the ply base a shade under-size to allow a bit of wiggle room.
Planning the pivots
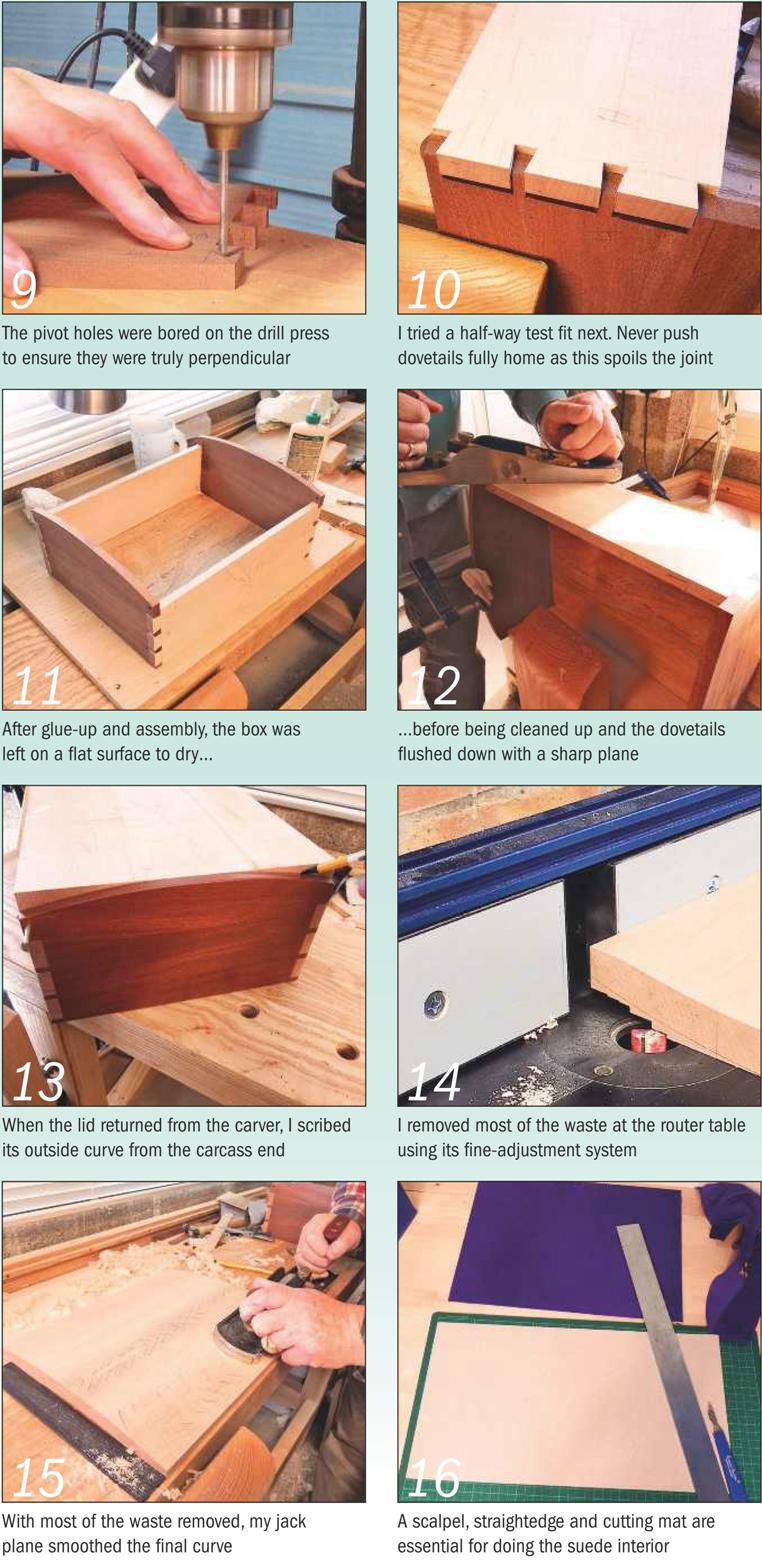
Plot the pivot hole positions on the box ends before marking the curved profile. This is then cut slightly shy of the line on the bandsaw. I finished mine off at the disc sander, which simplifies the task but does demand some care as even a fine sanding disc will quickly go down below the line if given its head. The lid pivot holes are best drilled on the drill press to ensure good alignment.
Peace of mind
Generally, I assemble dovetails without a trial fit, as every assembly and disassembly loosens the joint. But with all the edge-jointing and profiling involved, I’d invested a lot of time in this carcass already and really needed the reassurance of a partial trial fit.
I therefore allowed my blood pressure the concession of assembling each joint halfway to assure myself all was well before gluing up the carcass and leaving it to dry. I also gave the interior surfaces a good sanding before assembly while they were accessible, and cleaned up all the joints afterwards with a plane.
Inside story
The design includes a lift-out tray supported on 4mm mitred hardwood linings that also serve to cover the raw edges of the suede base lining. I cut the linings minutely overlength, then sanded and varnished them before mitring them. If the mitres are cut earlier it’s very difficult not to round over the ends of the pieces when sanding between coats of varnish. So I leave the ends square at this stage, and mitre them when they’re actually being fitted to guarantee crisp internal corners.
The lid returns
With the lid back from the carver, I trimmed it to fit perfectly between the sides of the carcass, leaving a small overhang at the back which I planed down by trial and error to form a stop. Then, with the lid cramped in place, I drilled the pivot holes using the holes in the carcass as a guide.
Then I turned my attention to curving the top surface. Well, that’s not strictly accurate – my attention had been on that for most of the time it was away! After my struggle with the inside radius, I knew I was going to rough out the waste at the router table, using a straight cutter and working from each side alternately.

Plane sailing
Having roughed out as close to the line as I felt confident to go (remembering I’d just paid a carver to inscribe the inside, I didn’t feel inclined to push my luck), I turned to a tool with which I’m much more familiar and confident – my trusty jack plane.
The technique here is to start by planing flats at progressive angles, removing the ridges left by the router and forming tangents to the line, and then to plane away the ridges which of course forms more flats, more tangents and more ridges. Continue this process for a while and the flats and ridges become tinier and can be sanded away.
Varnish time
Before finally attaching the lid, I did the varnishing. This is mainly to ensure that the tricky areas around the back and the pivots, inaccessible after assembly, are well covered. However, I usually do all the varnishing at this stage except the outsides of the box ends, which are left until the lid is on and the pivot holes plugged.
My preferred finish, as boxes tend to get an awful lot of handling, is a matt acrylic varnish. This provides good protection while retaining as far as practicable the natural colour and texture of the timber. It was now time to fit out the interior.
Internal affairs
First, I began by preparing the tray. A piece of black ribbon, looped back at the end, forms a handle, and I set it at the front as the tray actually needs to be lifted front first to clear the back of the lid as it is removed. I first glued the ribbon to the tray base using Copydex adhesive – and then with the ribbon in place, thoroughly brushed on a further layer of the same so the adhesive soaked right through for a good bond.
Next, I mitred the ends of the linings to a push fit using my birdhouse jig and a shooting board. The front lining may well need to be relieved very slightly on its lower edge where it passes over the ribbon, and this can be done with a small sanding drum.
Finally, I cut pieces of card a whisker under-size to fit the base of the box and the tray, and attached the suede with double-sided tape. Then, after a quick brush-up, the suede and the hardwood linings went in and the interior was transformed.
On with the lid
With those in place, the lid could finally be attached. I cut off two pieces of brass rod to the right length to leave room for a little 4mm plug cut from scrap sapele. This was glued in after the rods and left a tad proud to be trimmed flush afterwards. The box ends were then given their varnish finish.
After that, there was just one task remaining – but it’s one to which I accord a high degree of importance: to stand back and admire the finished object!