I was asked recently to make a garden bench that was oriental in style and had some form of centre table attached to it. An internet trawl threw up numerous design ideas, and eventually I found inspiration. Here’s the end result

A lthough this bench is designed primarily as a two-seater, it will comfortably seat three if the table is omitted. I chose iroko as the timber owing to its superb durability and golden colour, although this will gradually fade to a silvery finish. The end result is an attractive and comfortable bench that should last for many years.
Where to begin
Start by marking the outline for both rear legs on the timbers and cut their profiles. Plane away any saw marks and finish with abrasive paper, photo 1. Then mark out all the mortises; remember that there are handed pairs on much of the bench. Use a mortising gauge to mark out the mortises, ensuring that they’re centred on the timber where appropriate.
Use a pencil to mark the relevant mortise depth on each piece, photo 2, as they vary from part to part. Note that the lower back rail is flush with the front face of the rear legs. The back slats are also flush with the front face of both the upper and lower back rails. To complicate things a little more, the back slats are tapered so careful marking out is essential, photo 3. When marking out, allow for 5mm deep shoulders on each tenon.

The back rail mortises
Cramp the upper and lower back rails together to ensure everything lines up accurately. Remember that the mortises are narrower in the upper rail owing to the tapered slats. Cut all the mortises in the upper and lower rails using a mortise machine set to a 20mm depth of cut, photo 4. To ensure that the mortises are centred on the timber, I use a slightly smaller chisel than required, position the table so the cutter is aligned with the long edge of the mortise, and cut the slot. I then turn the timber round and, without altering the table settings, cut the remainder of the slot from the other edge. The result is a mortise cut bang on centre every time.
Cutting tenons one way…
After marking out each tenon on the end of the timber, I first remove most of the waste on the bandsaw, photo 5. The mortises for the tapered slats are cut to a little over 20mm in depth. A bearing-guided rebate cutter such as the ½in Trend 46/390 cuts a rebate just less than 20mm. When this has been fitted to a router table, the depth of cut can be set accurately to produce a tenon that’s a perfect sliding fit into the mortise.
By turning the timber onto its edge the shoulders are cut just as easily, photo 6.
…and another way I cut the large tenons on the ends of the lower back rail using a different method, as the ½in Trend router cutter is far too small.
I mark out the tenon and remove most of the waste on the bandsaw as before. Then I cramp a piece of mdf on the marked line, fit a bearing-guided trimmer to a router and set the required depth of cut. Using the router to trim the thickness of the tenon (and also to cut the shoulders square) guarantees an accurate fit into the mortise, photo 7. Make sure that the workpiece and the mdf guide are securely cramped to the work surface.
Cutting the back slats
As mentioned earlier, the slats are tapered. Make an mdf template in the shape of a slat, photo 8, and fix it to the workpiece with some double-sided tape. Remove most of the waste on the bandsaw, photo 9, before using a bearing-guided trimmer in the router table to clean up the edges using the template as a guide, photo 10.

Now for a trial run. Assemble the eight slats into the upper and lower back rails and use a straightedge to check that the tenons on the ends of both rails line up with each other. It is important that no glue is used at this stage. Just cramp the rails together to check that the slats are flush with the front face of the rails.
Finishing the back
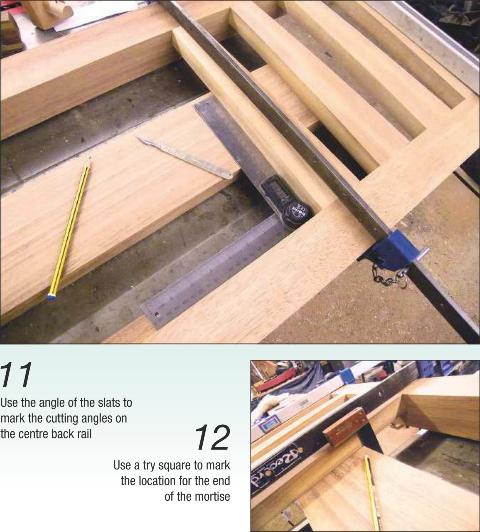
The large opening between the two groups of back slats is filled with a horizontal piece to which the table will be fixed later. This central back rail is secured to the two slats flanking it with mortise-and-tenon joints, cut using the following method. Position the uncut rail behind the slats and centre it between the upper and lower rails. Either draw a pencil line on it against the edge of the slats, or use an angle finder to record
the angle, photo 11.
This central rail needs to be cut at this angle on both ends, but must be 38mm longer than the gap between the slats as the bearing-guided rebate cutter used for the tenons cuts a 19mm rebate. Make further pencil marks on the edge of the slats to show the extremities of the mortise, photo 12.
Then cut the tenons on the ends of the rail using the rebate cutter and adjust them to fit into the mortises cut in the tapered slats.
Preparing the frame parts
The two end frames are straightforward to make using simple mortise-and-tenon joints. However, the various components need some preliminary shaping before assembly. The armrests taper very slightly on the underside towards the rear leg. A shallow dip is also cut along the top of the armrest to make this part a little more comfortable.
The under-hand curve at the end of the armrest is best cut on the bandsaw using an mdf template, photo 13, followed by trimming the curve with the bearing-guided trimmer. Remember to cut downhill with the grain to avoid any snatching of the timber, and to use the lead-on guide pin on the router table.
The top edges of the rails that support the seat slats are gently curved to provide a more comfortable seating position. Remember to cut these curves before gluing everything together; it’s much more difficult to do afterwards!
Assembling the frames
When you’re satisfied that everything goes together well, glue and cramp the frame components together using an exterior-quality adhesive such as Titebond 3, photo 14. Repeat this to assemble the other end frame.
Cramping the end of the armrest curve can be tricky, but taping a softener or scrap piece of carpet tile in place will protect the end of the curve. When the adhesive has thoroughly dried, remove the cramps and give the frames a thorough rubbing down with fine abrasive paper to achieve a good finish.
Fitting the long rails
The two seat rails and the lower back rail can now be glued in their respective positions, photo 15. Don’t glue the upper back rail in place yet; instead fit it in place dry as an aid to ensuring that the end frames are square. The centre back rail and the two slats supporting its ends can then be glued in place, followed by the other slats, photo 16.

Next, cramp the central seat support rail in place between the front and rear seat rails and attach it using suitable exterior-quality wood screws. For a neat finish, drill 10mm holes to a depth of 10mm in the rails and then drill pilot holes on through each rail into the end of the support rail. Drive home the screws and fill in the holes with plugs cut from an iroko offcut, photo 17.
Shaping the top rail
This rail, which up to now has simply been a square section of timber, can now be shaped to give it its characteristic oriental look. Make an mdf template of one half of the rail that can be flipped over to repeat the pattern on the other half. After removing the waste on the bandsaw, use the large bearing-guided trimmer to trim the timber to the profile of the template, photo 18. As the 1/2 in Trend 46/501 cutter isn’t long enough, simply remove the top bearing and trim the timber before flipping it over, replacing the bearing and then trimming from the opposite side, photo 19. Repeat this process for the other half of the top rail.
When this stage has been completed, the top rail can be glued in place using cramps
to hold the joints tightly together, photo 20.
Adding the seat slats
The six seat slats can now be cut to length and screwed in place to the seat rails. Use a scrap of wood planed to 21mm to ensure the spacing is equal. The front slat needs to be trimmed to fit between the front legs. For a neater finish, screw the slats in place from underneath via counterbored screw holes so the screw heads are concealed.

Making the table
The centre table is an optional useful accessory that can be omitted if you want a three-seater bench. The joints are mortises and tenons, cut as before using the Trend bearing-guided rebate cutter. Note however that the table has no right angles in it. It is narrower to the rear and wider to the front to give slightly more seating room towards the rear of the table, photo 21, so the joints have to be cut at an angle.
The three table slats are tapered slightly to complement the backrest design, and are glued in place in the frame, photo 22. A small wedge shaped from an iroko offcut supports the front edge of the table, photo 23. It is screwed into the underside of the table frame and to the centre seat support rail. Screws covered by wooden plugs secure the rear edge of the table to the lower back rail. Note that this edge will need to be bevelled slightly with a wood plane to marry up with the slope of the backrest.
Finishing off

Finish is a matter of personal choice. Iroko, sometimes known as poor man’s teak, is a naturally oily wood with good weather resistance. However, it will very quickly start to go silver in colour, although this process can be slowed down by the regular application of a suitable finish. I used three coats of Ronseal hardwood finishing stain in a clear finish, and time will tell how well this works. I’m certainly impressed so far!