The Woodworking Guru is asked to make a desk with a large work area, which is easy to move around and capable of hiding clutter.
When our daughter went to university, I thought it would be nice if she had a small reminder of home to take along. I was thinking a photo, or perhaps a nice notebook, but she told me to build her a desk! This one is just right for a laptop and a few files.
It also has a pen drawer and there’s a pretty generous work surface, but the desk is still light and small enough to move from campus to apartment. By simply extending the lengths of three parts (the back, stretcher and worktop), the desk can be made as wide as you like. Construction of the legs is straightforward mortise & tenon joinery, while the top is designed in three sections so that it can be run through a 305mm bench-top planer and then be assembled. The project can be completed in a few Saturdays, and it’s sturdy enough to survive through the next generation of students.
Spindly legs
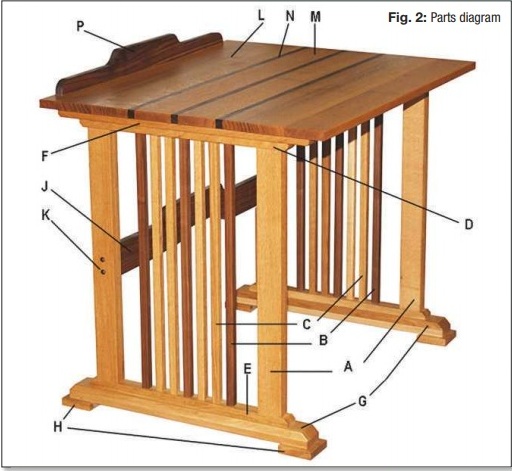
Each of the desk’s two leg assemblies has three black walnut and four white oak spindles. Mahogany and beech might also combine well. The darker walnut spindles line up with three walnut inlays that run across the desktop. Glue up stock for the four legs (A) and then rip, joint, plane and crosscut them to the dimensions shown in the cutting list. Rip, joint and plane stock for the 14 spindles (Band C), and then mark out for the stub tenons on both ends.

These come out at 6mm square by 12mm long, or what will fit nicely into your mortises. You can then set up a 3mm radius roundover bit in the router table and rout the long edges of the spindles and the legs (photo 1). Next, cut and joint stock for the top and bottom cleats (Dand E). All four cleats are chamfered on the ends of their best faces, using a mitre saw set to 45° (photo 2).

Round over the edges of these best faces on the router table, and then draw a pencil mark 25mm in from the ends (photo 3). Locating the spindles on the cleats is easy with the supplied pattern. Make four photocopies of the full-size pattern, and tape one to each cleat. Centre the pattern, then chop the mortises (photo 4). If you don’t have a hollow chisel mortising machine or a mortising kit for the drill press, then drill out most of the waste with a flat-bottomed Forstner bit chucked in the drill press. After drilling, square up the mortise walls with a 6mm chisel and mallet. Dry fit the spindle tenons to the mortises to check their sizing, and make any minor adjustments needed for a perfect fit. Working quickly, run glue into each of the mortises in one pair of cleats (photo 5), and brush a light coat on the shoulders and cheeks of half the spindles.

Repeat the process for the second half of the spindles (the second leg), and then clamp each assembly and allow the glue to cure overnight (photo 6). Pre-drill and countersink for four 50mm screws in each of the four legs, and then assemble the legs to the cleats without glue (photo 7). You should be able to do this while the glue on the spindles is still drying: everything is already lined up for you and clamped in place. The legs are located at the pencil lines you drew earlier. All six top and bottom plates (Fand G) are identical in size. The top plates are single thickness, while the bottom ones are doubled up (don’t glue them together yet). Chamfer and round over four of the six top and bottom plates, exactly as you did the cleats earlier.
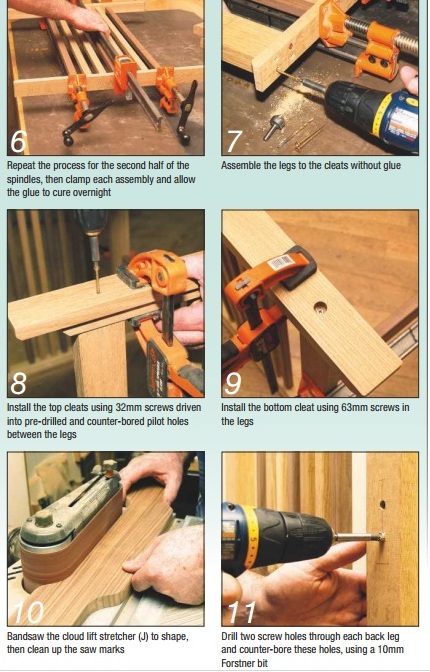
After the cleat assemblies are dry, centre them on the four chamfered top and bottom plates, then glue and screw these in place. Use 32mm screws driven into pre-drilled and counter-bored pilot holes between the legs so they don’t go all the way through (photo 8). Switch to 63mm screws in the legs. I like to counter-bore for screw heads when possible, rather than counter-sinking (photo 9); that’s just because sinking is a little inexact, and sometimes the heads still protrude a little. After everything is screwed together, glue and clamp the last two bottom plates in place, and then sand the edges flush after they dry.
Cut the feet (H) to size and round over all of their edges using a bearing-guided 3mm radius roundover bit in the router table, then screw and glue the feet to the bottom plates, leaving an even reveal on three sides. Bandsaw the cloud lift stretcher (J) to shape, and then clean up the saw marks. An oscillating belt sander works best for this (photo 10), but a drum chucked in a drill press works well, too. Use a 3mm radius roundover bit in the router table to clean up all four long edges (but not the ends) of the stretcher. I placed the stretcher so that the bottom was 330mm off the ground, but you may want to adjust that up or down for electric outlets, radiators or other obstructions. Drill two screw holes through each back leg and counter-bore these holes, using a 10mm Forstner bit (photo 11), then assemble the stretcher to the two leg assemblies, using four 63mm screws. Glue a walnut 10mm domed plug/button (K) into each counterbored hole, to hide the screw head.
In the next part, The Woodworking Guru show you how to make the desk top design, the file drawer and the drawer glides, which will complete the build.