
The Woodworking Guru recreates a classic childhood favourite – the pull-along brick truck – in durable beech, guaranteed to last a generation or two

My own children had a truck full of plain beech bricks, and it proved to be popular and hard-wearing when they were between two and five years old. This type of toy never seems to go out of fashion, and it isn’t difficult to make.
For this version the bricks are 50mm square, but if you think these are a bit too big for smaller children, you can simply reduce the size of the bricks and the truck accordingly. However, blocks of this size and density give the truck weight and stability so it can be pulled along smoothly.
The materials for this project cost no more than £20, and you can easily make it in a weekend.
Making the wood bricks
Choose a fine-grained timber which is strong enough to withstand toddler play without bruising or splintering; beech is excellent. Prepare the piece of wood which will be sliced into bricks. This can be done with a handsaw and plane or by machine. Sand all four surfaces thoroughly and radius the edges.

Toy Brick Truck Instruction Photos 1-2
Cut twenty 50 mm square blocks from the prepared wood. A mitre saw such as the Nobex is ideal for this, photo 1. Cramp a simple length stop to the table to ensure that all the blocks are cut to the same size.
Making repetitive cuts to produce small sections of wood using a bandsaw or table saw is inherently dangerous, and therefore I favour the hand mitre saw – it may take longer but it’s much safer!

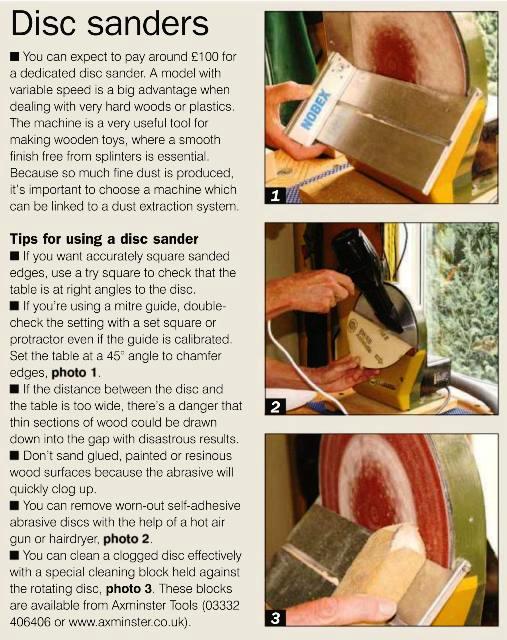
Sand the blocks once again so all the cut edges and corners are absolutely smooth and square, photo 2. The blocks are now ready for finishing, photo 3. If you have a disc sander, tilt the table to 45° and chamfer each edge, photo 4. Then round off the chamfers by hand or with a small drum sander, photo 5.
Producing the bricks is quite time-consuming. They need to be given at least two coats of clear varnish to protect the wood, allowing for the drying time between each application – check the directions on the tin. Alternatively you can paint them, decorate them with stencilled letters or numbers, or apply proprietary stickers and varnish over them.

Toy Brick Truck Instruction Photos 3-11
Making the truck body
The truck is basically a box on wheels which holds the 20 bricks. Butt them up in four rows of five and measure the overall dimensions of the arrangement. To allow the bricks to fit loosely, add an extra 3mm to each figure to get the internal measurements of the truck.

Toy Brick Truck Figure 1
Prepare the wood for the sides and ends of the truck to a fine, sanded finish. Then fit a 12mm parallel flute cutter into your router and cut two 12 x 6 mm deep grooves across the sides, as shown in fig 1 and photo 6. I used an overhead router fitted in a Proxxon stand with a home-made table and guide. Because the router I use is a Trend T3, which isn’t particularly powerful, I produced the required depth by making two passes.
Unplug the router and replace the cutter with a 6mm parallel flute cutter. Set up the table and cut a 6mm wide groove 6mm from the bottom edge of each piece, photo 7. Rout the end pieces to a depth of 6mm and the sides, between the two vertical grooves, to the same depth, as shown in fig 2 opposite.

Toy Truck Instruction Figure 2
Assemble everything as a dry run. Then mark out the plywood base to the correct size and cut it out. It’s well worth taking the trouble to sand both surfaces of the plywood with a random orbital sander to achieve a smooth, splinter-free surface.
 Glue, assemble and cramp up the truck body, using soft-jaw cramps so you don’t mark the work surfaces, photo 8. Round off the exposed ends of the truck sides with a disc sander.
Making the wheels
Start with thicknessed and sanded wood. Draw out four 80mm diameter circles with compasses, and drill a 5mm diameter hole in the centre of each circle. Cut them out with a scrollsaw, photo 9.
Make a simple jig which can be cramped to the disc sander table. Mine is a board offcut with a 5mm dowel positioned so that each wheel can be held on it and rotated against the revolving sanding disc to ensure that it’s completely round, photo 10. When you’ve done this, de-burr all the edges.
Towing bracket and toggle
This bracket neatly attaches the cord to the truck. Shape the wood, photo 11, and drill and countersink the two holes for the fixing screws. Then drill and counterbore a hole through it for the cord.
 Knot this, heat-seal the end and thread it through the hole in the bracket. Alternatively, you can use a blob of super-glue or hot-melt glue to seal and secure the cut end of the cord. Screw the bracket to the truck body with two 20mm No 4 countersunk screws.
Shape the pulling toggle from a solid piece of hardwood, with the central hole once again counterbored to take the other end of the glued-in cord. The parts are now ready for assembly, photo 12. Paint, varnish and decorate the truck and wheels as required.
Final assembly
Drill pilot holes for the wheels in the sides of the truck so the screws go through the sides and into the ends. Position them so they project about 12mm above the top edge of the truck body.
Screw on the wheels using 50mm No 10 roundhead brass screws, with a washer between each wheel and the side of the truck, photo 13. Check that each wheel rotates freely. Finally, screw on the towing bracket, photo 14, and load up the bricks ready for action.


It is the best time to make some plans for the future and it’s time to be happy. I’ve learn this publish and if I may I wish to suggest you some atnrbtion-geanbitg things or advice. Maybe you could write next articles regarding this article. I desire to learn more things about it!